


This all started in January. I was on a Far East vacation to escape the winter cold and had the pleasure of spending three evenings with [Legacy Magazine Executive Editor] Dan Kempner and his family while visiting Ho Chi Minh City in southern Vietnam.
One evening, while my sister played games with the children and chatted with his wife, Dan explained that he was seeking regular contributors on certain topics for the magazine. He ticked them off on his fingers, but when he got to ‘fixing stuff,’ it struck a chord with me.

The author on Hạ Long Bay, Quảng Ninh province, Vietnam.
Photo by Madeleine Dunham, January, 2025
I was still mulling whether I had something useful to write about in this vein when, returning to Canada from Vietnam, I learned that my partner of some twenty years would not be home to greet me.
“I have an appointment,” she’d said on the phone.
So I came home to a dark house and, when I opened the garage, saw a table there, and a bed frame, neither of which had been there when I left. Once fairly inside the house it was clear that she had, in fact, moved out.
She’d left in a hurry too, judging by the mess, and she’d taken everything (except the kitchen sink, as you’ll see). Frankly, after more than eighteen hours’ traveling, all I cared about at that moment was a shower and some sleep. When I arose next morning and contemplated the situation I began counting my blessings and clearing up my home. Many things had to be fixed.
I like that word ‘fixed’ because it doesn’t imply perfection or any degree of permanence. It just means making something that has become unserviceable useful again. Any auto mechanic will understand exactly what I mean.

The Homecoming. Image rendered by ChatGPT/Gemini Ai
The fact is, almost everything we buy these days either is already, or is becoming, unfixable—principally due to corporate greed. Remember when automakers offered seven-year parts & labour warranties on drivetrains and major parts? For most, those days have already passed into folklore.
But I digress. Being unable to earn a regular income for over a decade, I’ve learned to fix everything from bathrooms to bannisters, cars to computers, lawn mowers to lighting, as well as many less- alliterative items.
My Nan—Brit-speak for grandma—used to espouse the adage, “Poverty is a wonderful teacher!” That was a useful platitude as, by modern standards, Nan was very poor. Yet she was right: there’s no better catalyst for learning than an urgent problem you can’t afford to pay someone else to fix.
Through my work as a designer I had gained a familiarity with materials both ancient and modern, along with a modest degree of confidence in my ability to fix stuff.
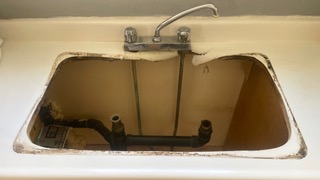
Case in point: the original, twin-bowl, stainless-steel sink in my kitchen. It was designed with neither tap-ledge nor gasket, meaning the faucet had to be installed directly onto the countertop. It hadn’t gone well.
Installers were advised that a bead of caulk on the counter was enough to tighten the sink down. Needless to say, the installer —whether from inexperience, laziness, or both—had taken no such precautions. There was already visible damage when I bought the seven-year-old property.
At some point I was compelled to return to the UK for an extended time to look after my aged mother.
I returned, six years later, to find my partner had been washing her dishes in the bathroom sink.
Of course, I wanted to fix the kitchen immediately, but it wasn’t that simple. My ‘partner’ kept raising objections, “Wait ’till you’ve fixed my mum’s bathroom!” she demanded, so I handled the mould problem at her mother’s house. Then again, she insisted, a repair would take too long, be too dirty, cause too much disruption.
Since I had to go back to the UK again anyway, I took a pragmatic approach: the kitchen was principally her domain and it didn’t bother her; so, I’d fix it when she wanted it fixed.
But now, after her fire-sale-like exit, I could do the job when I wanted and without being rushed. Ahhh.
In my experience, the first step to planning almost any fix is a thorough inspection of the problem. I had failed to do this when choosing my partner—that was clear—and I wasn’t going to make the same mistake with the kitchen sink. She had gone and now the old faucet had to go too.
I had decided to install shut-off valves on the water feeds, but it soon became apparent that the counter behind the sink was so badly rotted that it would not be able to support a new sink. I had hoped to use the new sink’s tap ledge to cover the damage, but this might mean a new countertop after all. But six hundred bucks and a two-month wait for a new counter, plus delivery?
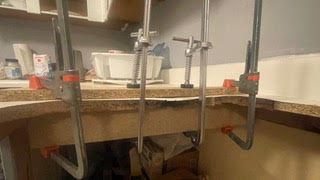
I slept on it and decided some particle-board scrap, a little glue, and some extra time versus all the above (plus tax) was no contest!
I thought I’d start by trying to flatten out the warped area to the left of the sink. I glued-and-clamped particleboard bracing under the counter, as close to the edge as the new sink’s clamps would permit.
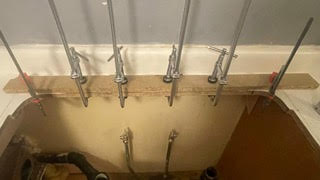
Much better! Time to fix the rear edge.
Removing the rot was easy, but the laminate—very old and thin— required a delicate touch with a razor-sharp chisel to avoid further damage. Then I glued in a strip and clamped a piece of scrap particleboard to flatten and support the laminate.
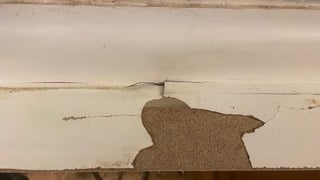
That looked like the beginning of success, but the material I had was not wide enough, and the right edge of the cut-out was also rotted and would collapse if the sink clamps were tightened onto it. So I repeated the process of cutting, glueing, and clamping. Literally, rinse and repeat.
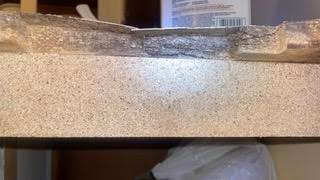
Next morning, with the clamps removed, I knew I was winning. The cutout now had four solid edges for the sink clamps to engage on.
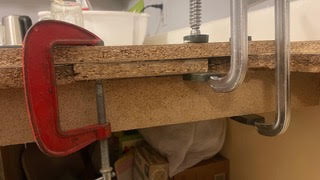
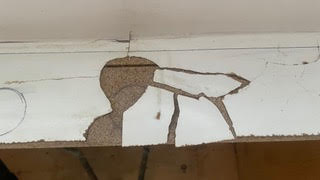
I decided to glue down the broken pieces of laminate and further reinforce the rear edge of the counter. I let it all dry overnight, and then I had something I was confident would support two bowls full of water and dishes. But the cracked laminate was still a problem.
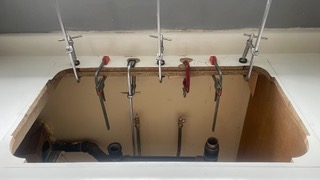
I’d used auto-body filler to repair cracks before, but this situation wouldn’t allow for painting.
I found some white Bondo but, at forty bucks for a small tub, it cost way too much. So I went with a small tube of white plastic putty, used for the kind of model kits we all assembled when we were kids. It cost me $5.95 and was just enough to do the job.
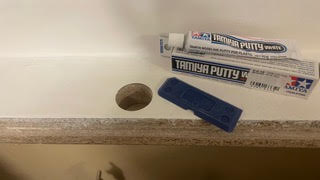
I applied it sparingly with a caulking tool and waited. It didn’t take long to dry, but as I expected, it shrank a little so I applied some more. It took three layers to make up the thickness of the laminate, but after a fine sanding I was happy with the result, and drilled the faucet hole!
Finally, I got to install the ‘new’ used sink. I already had an old faucet—another rescue job from at least 25 years ago. It needed cleaning and a small part, which the manufacturer sent me for nothing. It was a Moen, one of the few decent companies still building things that last, and that continues to back its products with spares.
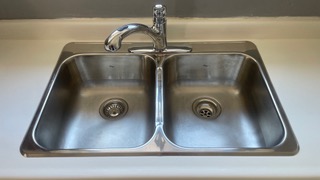
Total cost? A little time, a bit of effort, a few scraps; some glue, the loss of a relationship, a litre of gas, and $46.72 Canadian. Not bad for (give-or-take a few decades) a day’s work!
About the Author:

John Dunham is an award-winning interior, exhibit, and showroom designer who has worked on interiors for “the titled, the entitled, and celebrities.” His designs continue to be reproduced and have been ripped off by the likes of IKEA, et al. He resides in Ontario, Canada, where is the proud owner of an unimpeachably installed stainless-steel sink.